Projects & Tutorials
·
15 min read
Projects & Tutorials
·
15 min read

A didgeridoo is a difficult instrument to play quietly. This is perhaps not a revelation to anyone who has spent much time around one, but it became rather important to me when I bought a flat in 2025.
I’d already had one period where the place I lived got in the way of playing. In 2022 I moved into a house share and, for about a year, my practice more or less stopped. There are instruments you can quietly work on in your bedroom without anybody noticing. A didgeridoo, with its long, low drone travelling enthusiastically through walls and floors, isn’t really one of them.
It wasn’t until I moved back in with my parents, who were extraordinarily forgiving about the amount of didgeridoo that subsequently entered their lives, that I started practising properly again. Thanks, Mum and Dad!
So when I eventually bought my own place, I knew I needed a better solution. I was moving into a flat with neighbours below me, and I didn’t particularly want my arrival to be announced by a mysterious bass frequency coming through their ceiling every morning. A friend of mine once actually received an ASBO (Anti-social Behaviour Order) for playing didgeridoo at unsociable hours. That at least reassured me that this was not an entirely imaginary concern. It also gave me a fairly clear career path to avoid.
Going outside was the obvious answer. I still do that, particularly when I want to play my more powerful wooden didgeridoos, and there is something wonderful about playing an instrument like this somewhere it can properly open up. But it isn’t a very good everyday practice system. If I want to play for an hour in the morning, I don’t want to turn it into an expedition involving clothes, weather, carrying instruments and finding somewhere sufficiently far away from innocent members of the public. The more steps there are between thinking I should practise and actually practising, the less likely it is to happen.
What surprised me when I started looking for alternatives was how little information there seemed to be. Quiet practice must be a problem for plenty of musicians, but with didgeridoo it feels particularly acute. Even played gently, mine is loud, and it produces exactly the sort of deep, continuous sound you don’t necessarily want travelling into somebody else’s flat.
So I started wondering whether I could contain some of it.
Some time earlier, I’d come across a short German video called Didgebox Mark I – Der Schalldämpfer für’s Didge. It showed someone playing a didgeridoo into a box that seemed to reduce the sound quite dramatically. The video was about thirty seconds long, in German, with German subtitles. My German is not good enough for this to have been the detailed technical education I was hoping for, and Google Translate did not suddenly reveal a hidden acoustic engineering manual. Still, the idea stuck with me.
If most of the sound is coming out of the bell, perhaps I could put the bell somewhere designed to absorb and contain it, then put a microphone inside so I could still hear what I was doing.
I was probably a little too optimistic at first about how quiet I could make it. What I ended up with is better described as a sound-reduction box than a soundproof box. It doesn’t silence the didgeridoo, and I wouldn’t expect the same results with every instrument, room or building. I also deliberately use it with a relatively quiet carbon fibre didgeridoo rather than one of my more powerful wooden didgeridoos.
For my situation, though, it has worked remarkably well. In a rough test at one metre, the level fell from about 85 dB playing normally to 76 dB with the box. More importantly, my downstairs neighbour tells me they can’t hear me practising.
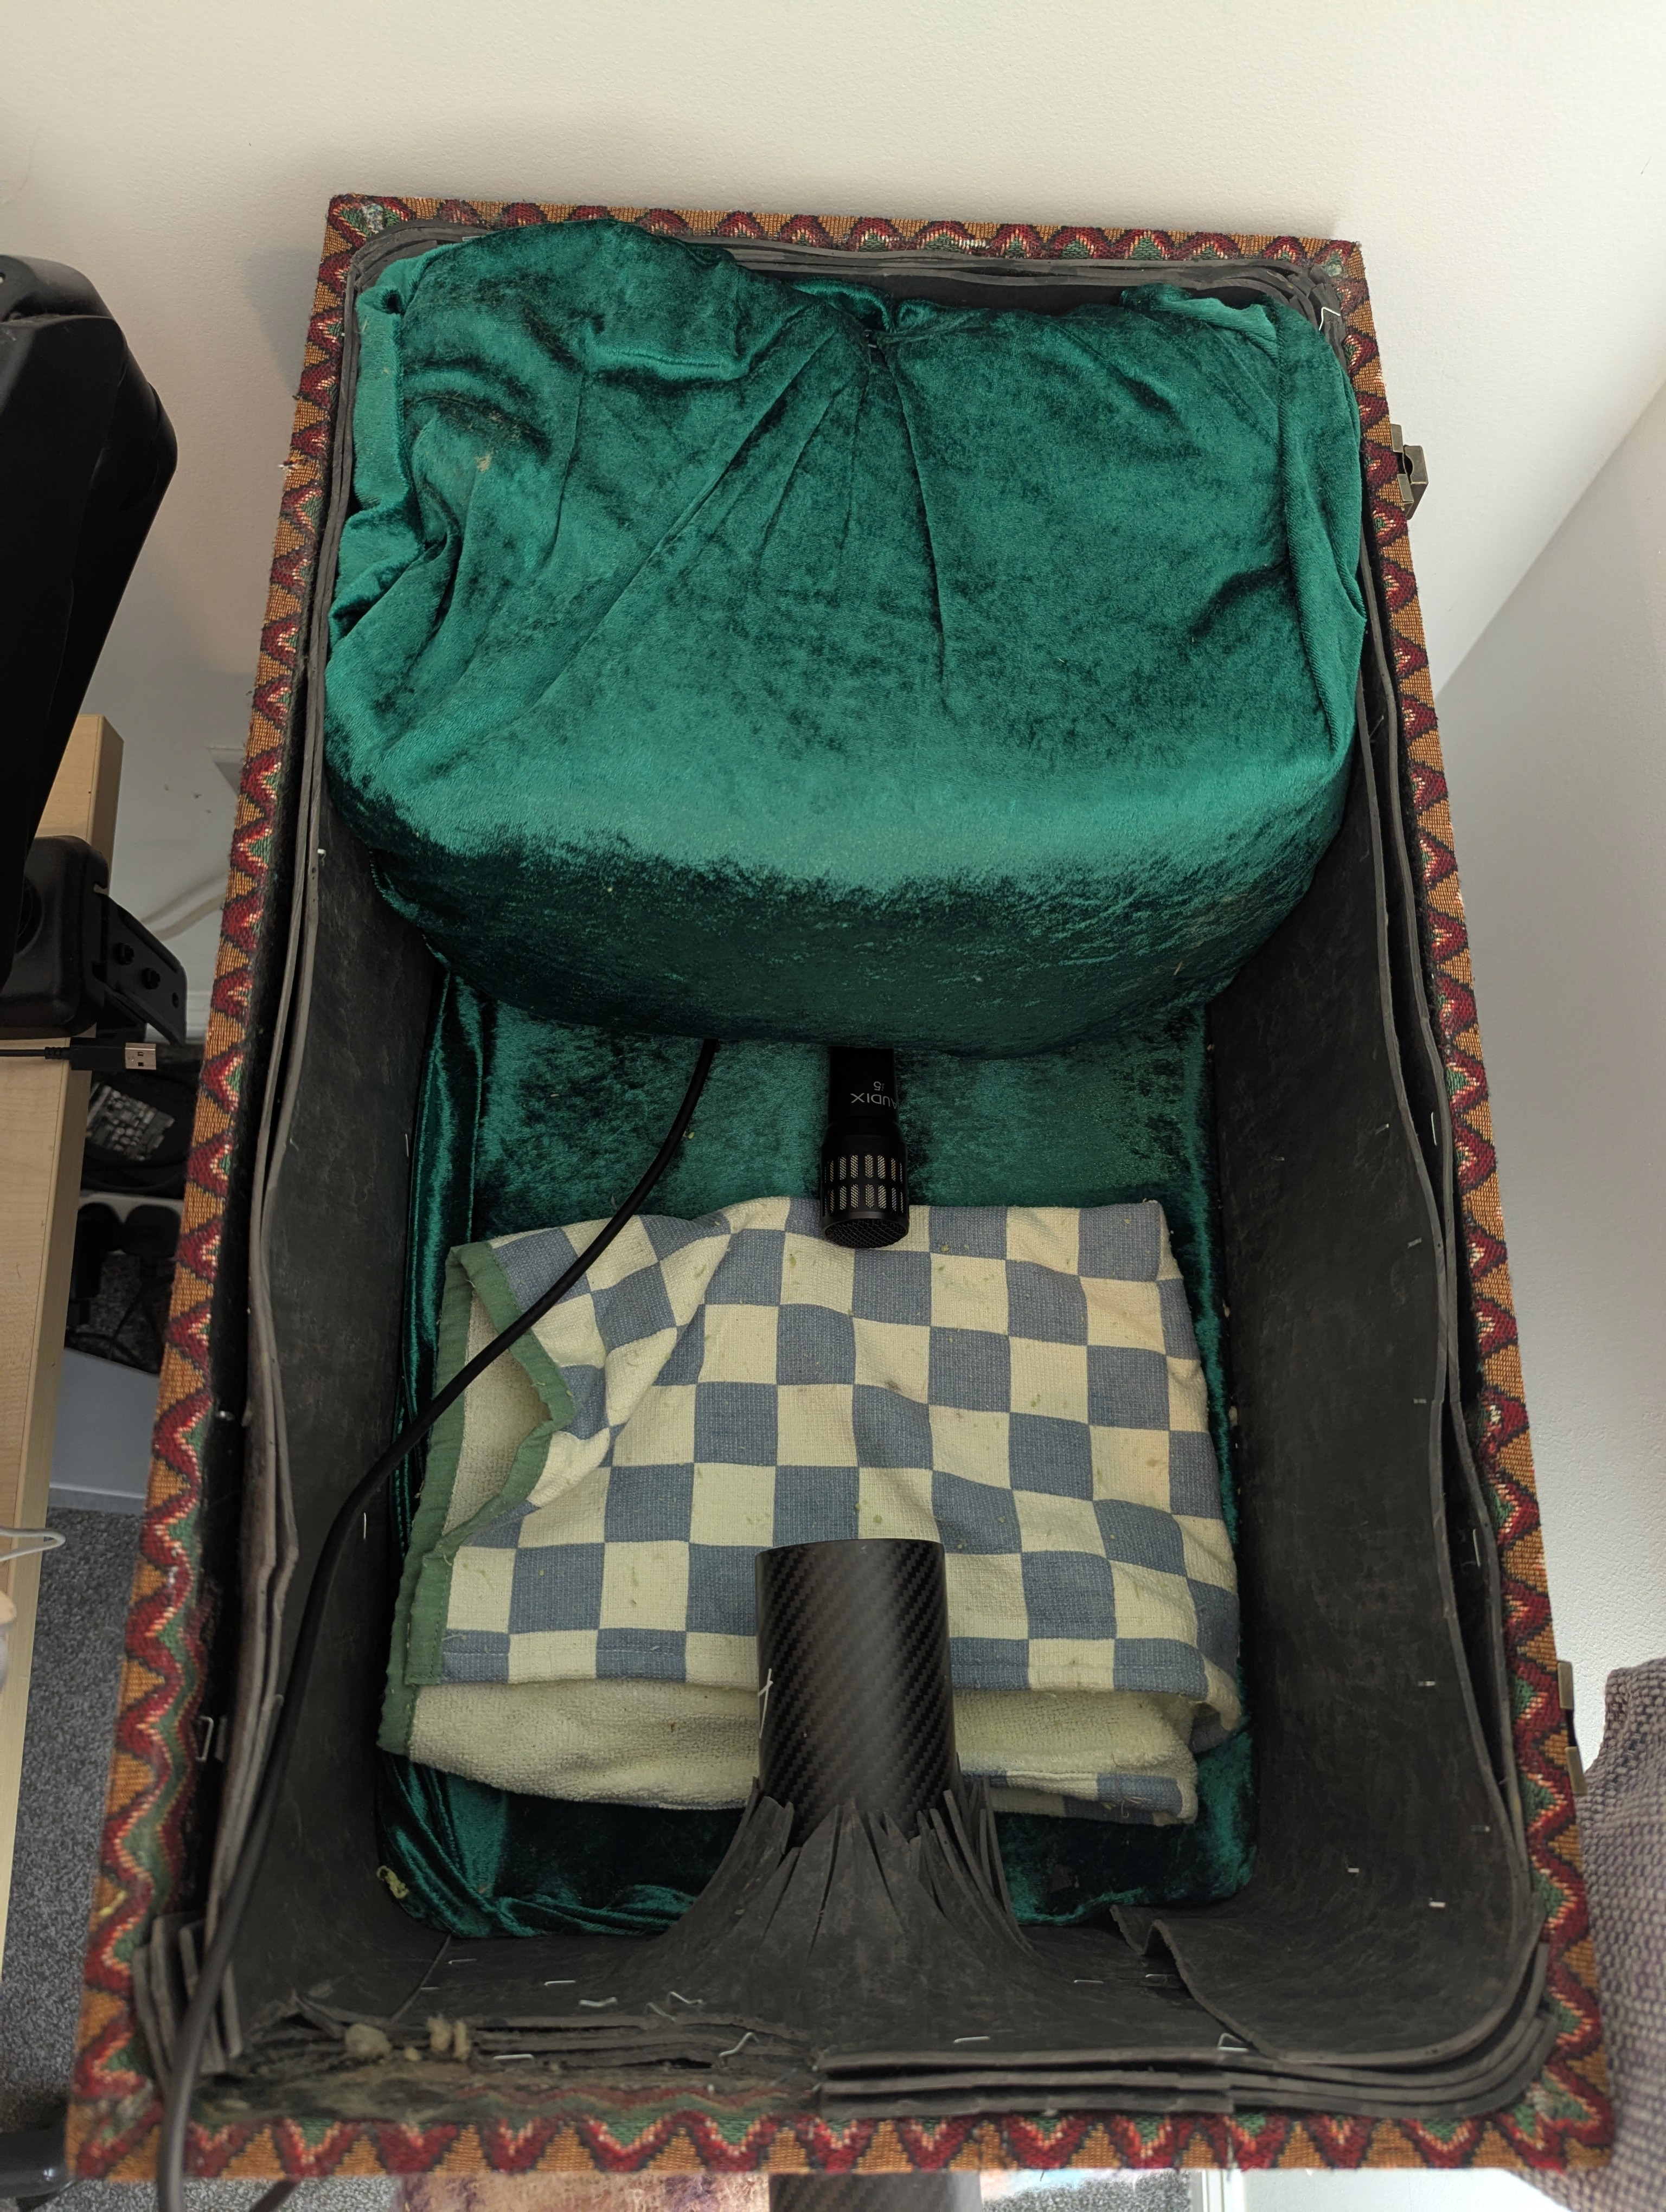
The design itself is fairly simple. I took a wooden storage trunk, lined it with several layers of mass-loaded vinyl, added Rockwool inside, cut an opening in one end for the didgeridoo, and put a microphone inside. The bell sits in the box and I listen through headphones.
My finished signal chain is:
Didgeridoo -> insulated box -> microphone -> audio interface -> headphones / FL Studio
If you’re mainly here because you want to build something similar, this is the short version.
A reasonably solid wooden trunk or box. Mine is about 59 × 39 × 38 cm externally
2 mm mass-loaded vinyl, 5 kg/m²
50 mm Rockwool RWA45
Breathable fabric for wrapping the Rockwool
Contact adhesive
Something to isolate the box from the surface underneath. I use speaker isolation pads and a folded blanket
I also looked into acoustic sealant and will come back to that later, but I didn’t use it in the final build.
Didgeridoo
Microphone
Audio interface
XLR cable
Headphones
I already owned all of the audio equipment, my Airdidge and the speaker isolation pads. I also already had the fabric and basic tools.
For the box itself, what I actually bought was:
Item | What I paid |
|---|---|
Wooden trunk | £15.00 |
Mass-loaded vinyl | £34.99 |
Contact spray adhesive | £6.99 |
Rockwool RWA45 | £59.99 |
Total new spend | £116.97 |
I didn’t use anything close to the full pack of Rockwool, so that figure slightly exaggerates how much material is actually in the box. I already owned the isolation pads I used, which were about £29.99 when bought.
If you were buying everything from scratch, your total would obviously be higher, particularly once you include whatever microphone and interface you choose. Equally, this could be done a lot more cheaply if you already own some of the equipment, have suitable materials lying around, find a second-hand box or improvise the isolation underneath it.
I think this is worth mentioning before getting into the build because it affects how you should interpret my results.
I own several didgeridoos, but I deliberately use one of the quieter and more practical ones with the box. My favourite wooden didgeridoo is a split-wood instrument made by Tall Paul. It is wonderfully powerful, which is exactly what I like about it and exactly what makes it unsuitable for casually playing above someone’s living room. If I want to play that properly, I take it to a nearby field.
For indoor practice, I use my Airdidge. It is less powerful and, because it is adjustable, allows me to practise in multiple keys without needing several instruments permanently leaning against my desk. I’ve also fitted mine with a custom wooden mouthpiece. The standard one is plastic, but I simply prefer the feel of playing on wood.
So when I say later that my neighbour can’t hear me, bear in mind that I’m not putting my loudest didgeridoo into the box and hoping for the best.
I spent quite a lot of time researching before I started cutting anything. I looked into mass-loaded vinyl, Rockwool, sealing gaps, vibration isolation, microphone positioning and various possible ways of dealing with airflow. I wanted to understand roughly what each part was supposed to be doing rather than fill a box with soft-looking things and hope that acoustics would be impressed.
Eventually I found a wooden storage trunk in a furniture shop for about £15. It was solid, had a hinged lid and, at roughly 59 × 39 × 38 cm externally, was almost exactly the sort of size I’d been looking for. The main internal compartment was approximately 57 × 34 × 29 cm, with another 6 cm or so of height in the lid. That left enough room for the lining, the didgeridoo bell and a microphone without everything being crammed together.
There was only the small matter of getting it home. I looked at the trunk, looked at my bicycle, and correctly concluded that attempting to cycle home while carrying it would be an extremely stupid thing to do.
I tried anyway, made it approximately 150 metres, fell off and broke a rib.
So, before we get into the more useful lessons about acoustics: if you find the perfect box, get a lift home.
There are three slightly different things going on in the finished setup, and it’s useful not to lump them all together as "soundproofing".
The mass-loaded vinyl adds mass to the walls and helps with airborne sound escaping through the box walls. The Rockwool absorbs some of the sound energy inside the enclosure, reducing reflections. The pads underneath help reduce structure-borne vibration travelling mechanically from the box into the furniture and floor.
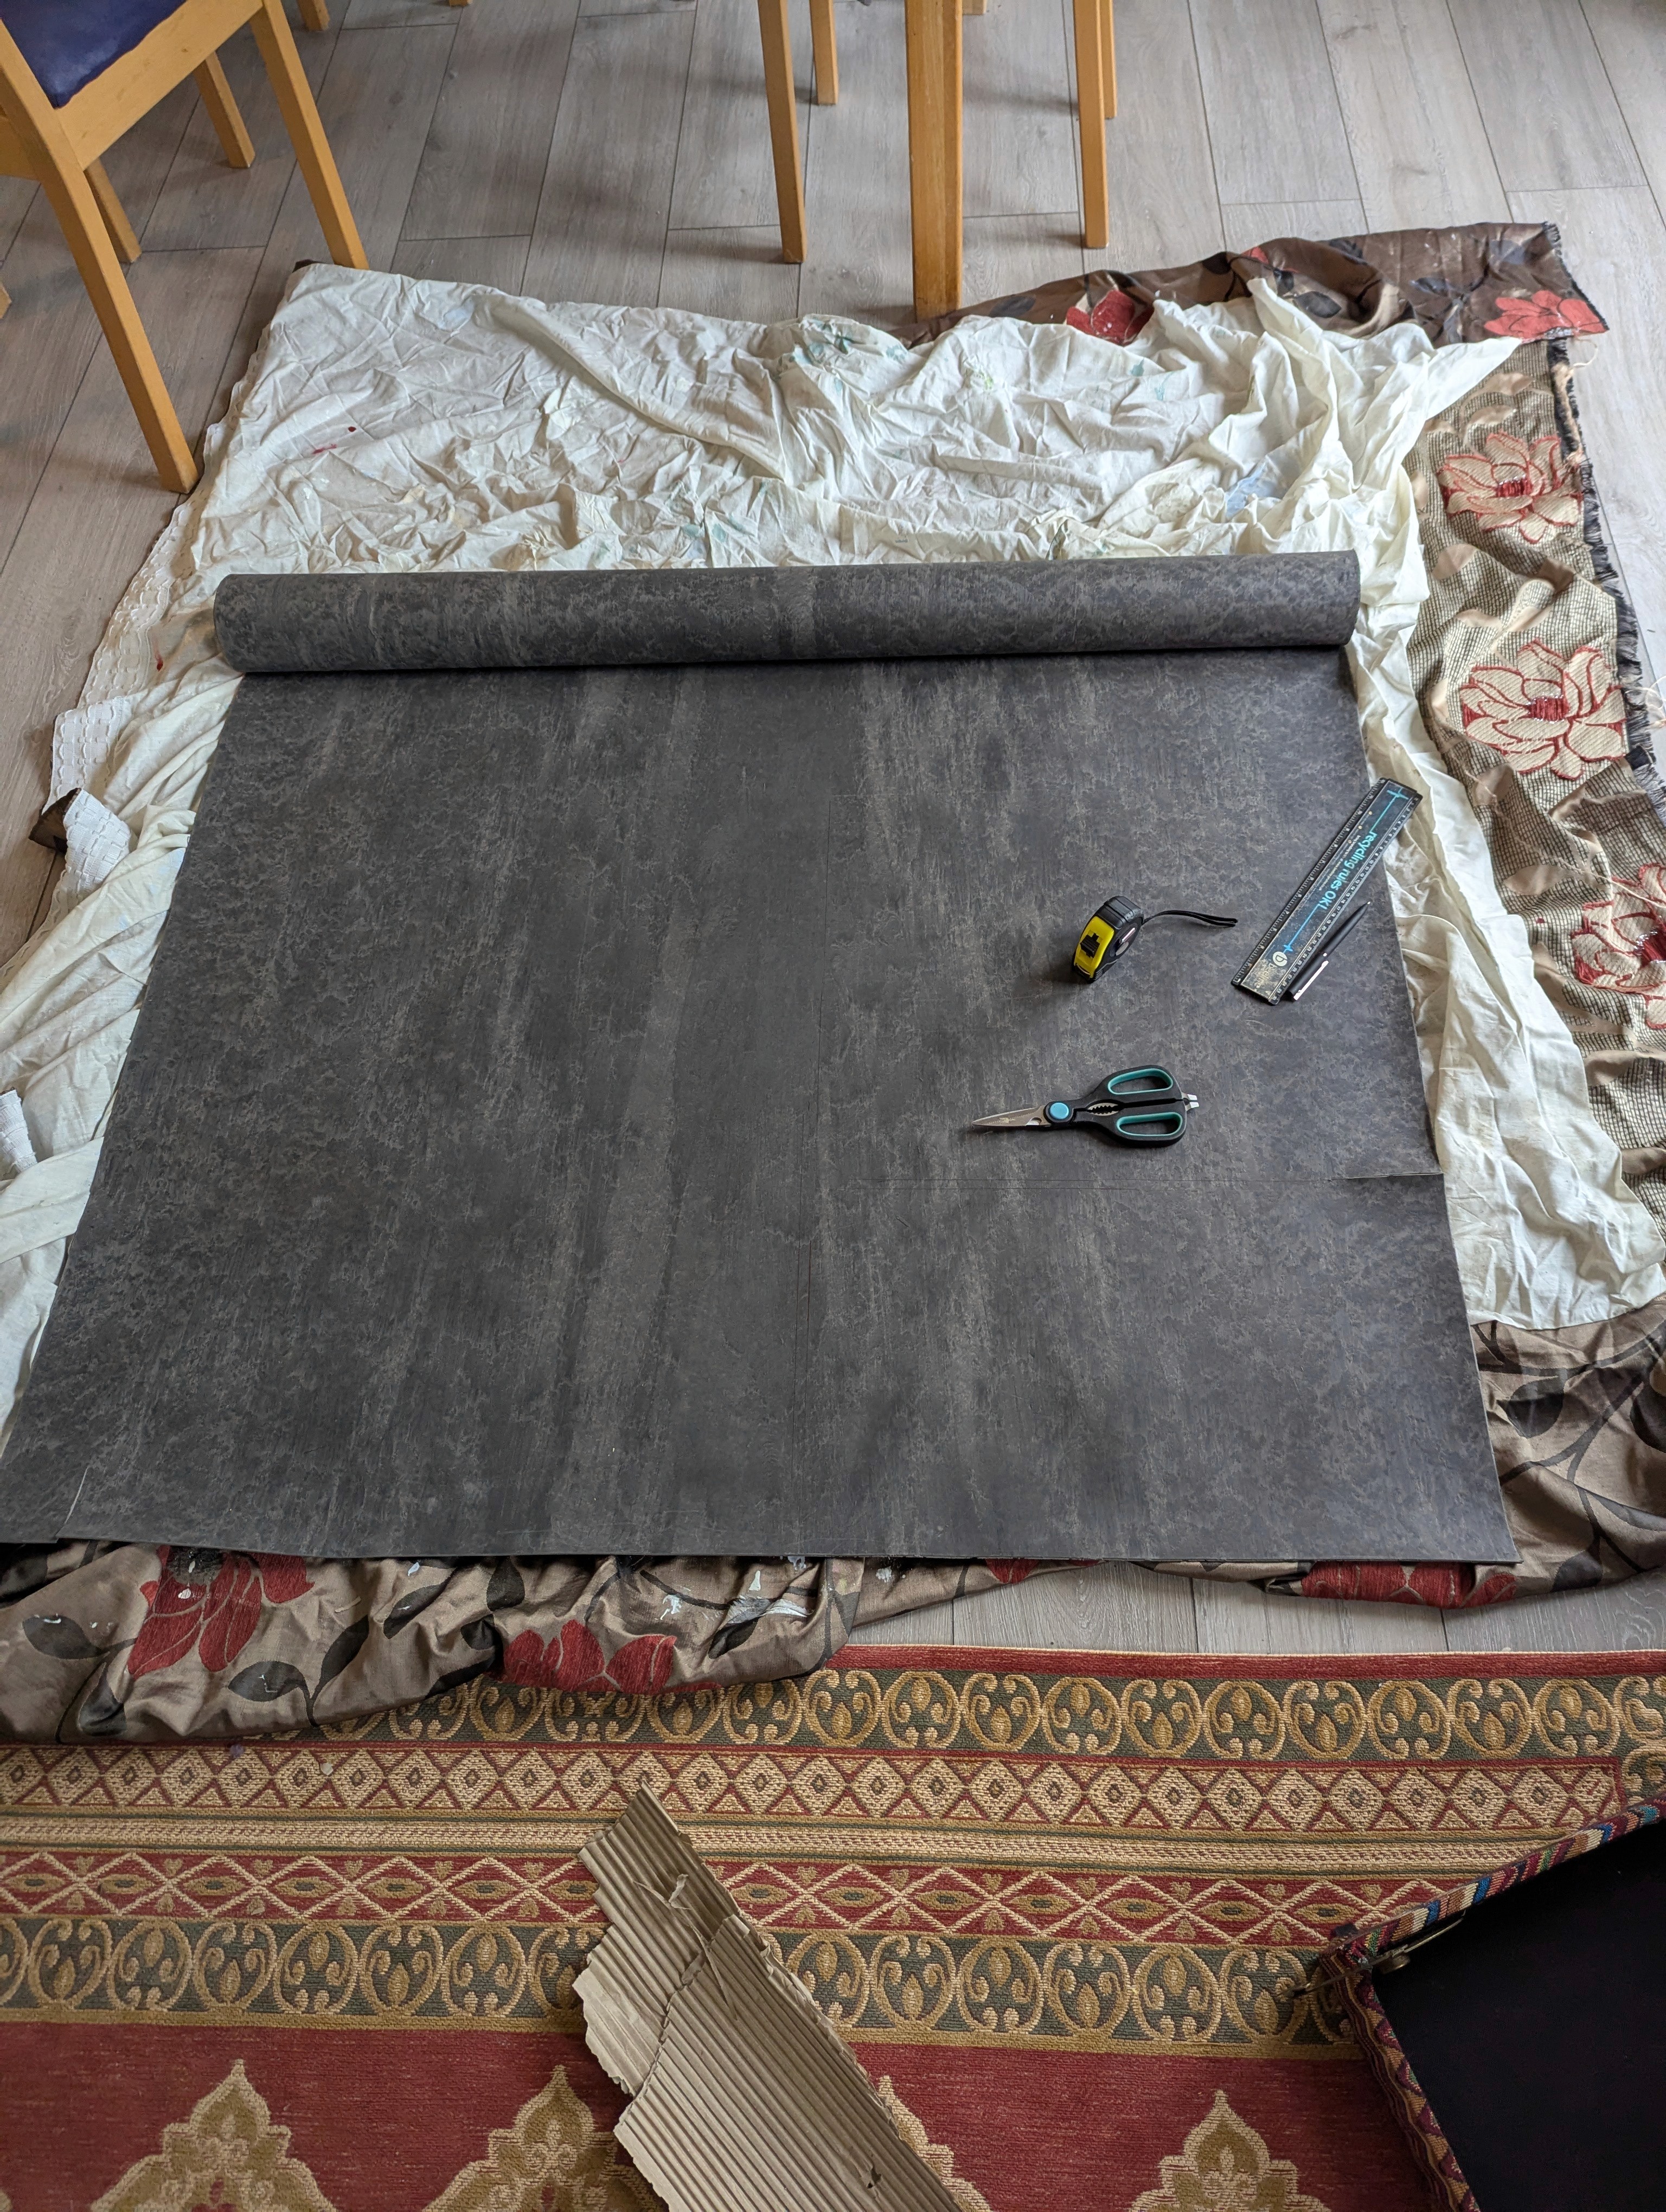
I used Advanced Acoustics Premium Mass Loaded Vinyl, supplied as a 1.25 × 3 metre roll, 2 mm thick and weighing 5 kg per square metre. Mine cost £34.99.
MLV is a very dense, flexible sheet. The wooden walls of my trunk were relatively thin, so I wanted to add substantial mass to the inside without using up too much space.
I used two main layers across the internal surfaces, with extra overlapping material around the didgeridoo opening.
It’s surprisingly easy to work with. A straight edge and a sharp craft knife will cut it perfectly well. The word sharp is worth emphasising. Trying to repeatedly drag a tired craft blade through dense vinyl turns a simple job into a personal feud.
The other main material was 50 mm Rockwool RWA45. I bought a pack of nine 1200 × 600 mm slabs for £59.99.
This was far more Rockwool than I actually needed for one box. Unfortunately, Rockwool is generally sold with slightly grander ambitions than lining a single didgeridoo enclosure.
I considered acoustic foam as well but didn’t use any in the final build. Once I had the Rockwool in there, I didn’t see much reason to keep adding more material.
I used Everbuild Stick 2 contact spray adhesive, which cost £6.99, mainly because it was quick and easy to apply across larger surfaces. This was partly a considered building decision and partly me being a bit lazy.
It worked, although not perfectly. There are places where I prioritised getting the material securely attached over making everything look immaculate, and if I built another version I’d probably spend a bit more time on this part.
I also researched acoustic sealant, particularly Everbuild Everflex AC50, because gaps can become weak points in sound isolation. I’d repeatedly come across the principle that air leaks are sound leaks, but I didn’t actually use acoustic sealant in this version of the box. Given what I later discovered about airflow, trying to seal absolutely everything would not have been especially helpful anyway.
The finished box sits on a folded blanket on top of two foam speaker isolation pads, which I already owned.
This reduces the mechanical connection between the box, the table and the building. You could also use halved tennis balls as a cheaper alternative.
The dimensions below are what worked for my trunk rather than a template to copy exactly. Boxes aren’t always perfectly square, either, so measure the one in front of you.
My grandad always used to say, measure twice, cut once. Like most good advice, this sounds slightly tedious until you ignore it.
My starting internal measurements were approximately:
Floor: 57 × 34 cm
Long walls: 57 × 29 cm
Short walls: 34 × 29 cm
Lid top: 57 × 34 cm
Lid sides: around 6 cm deep
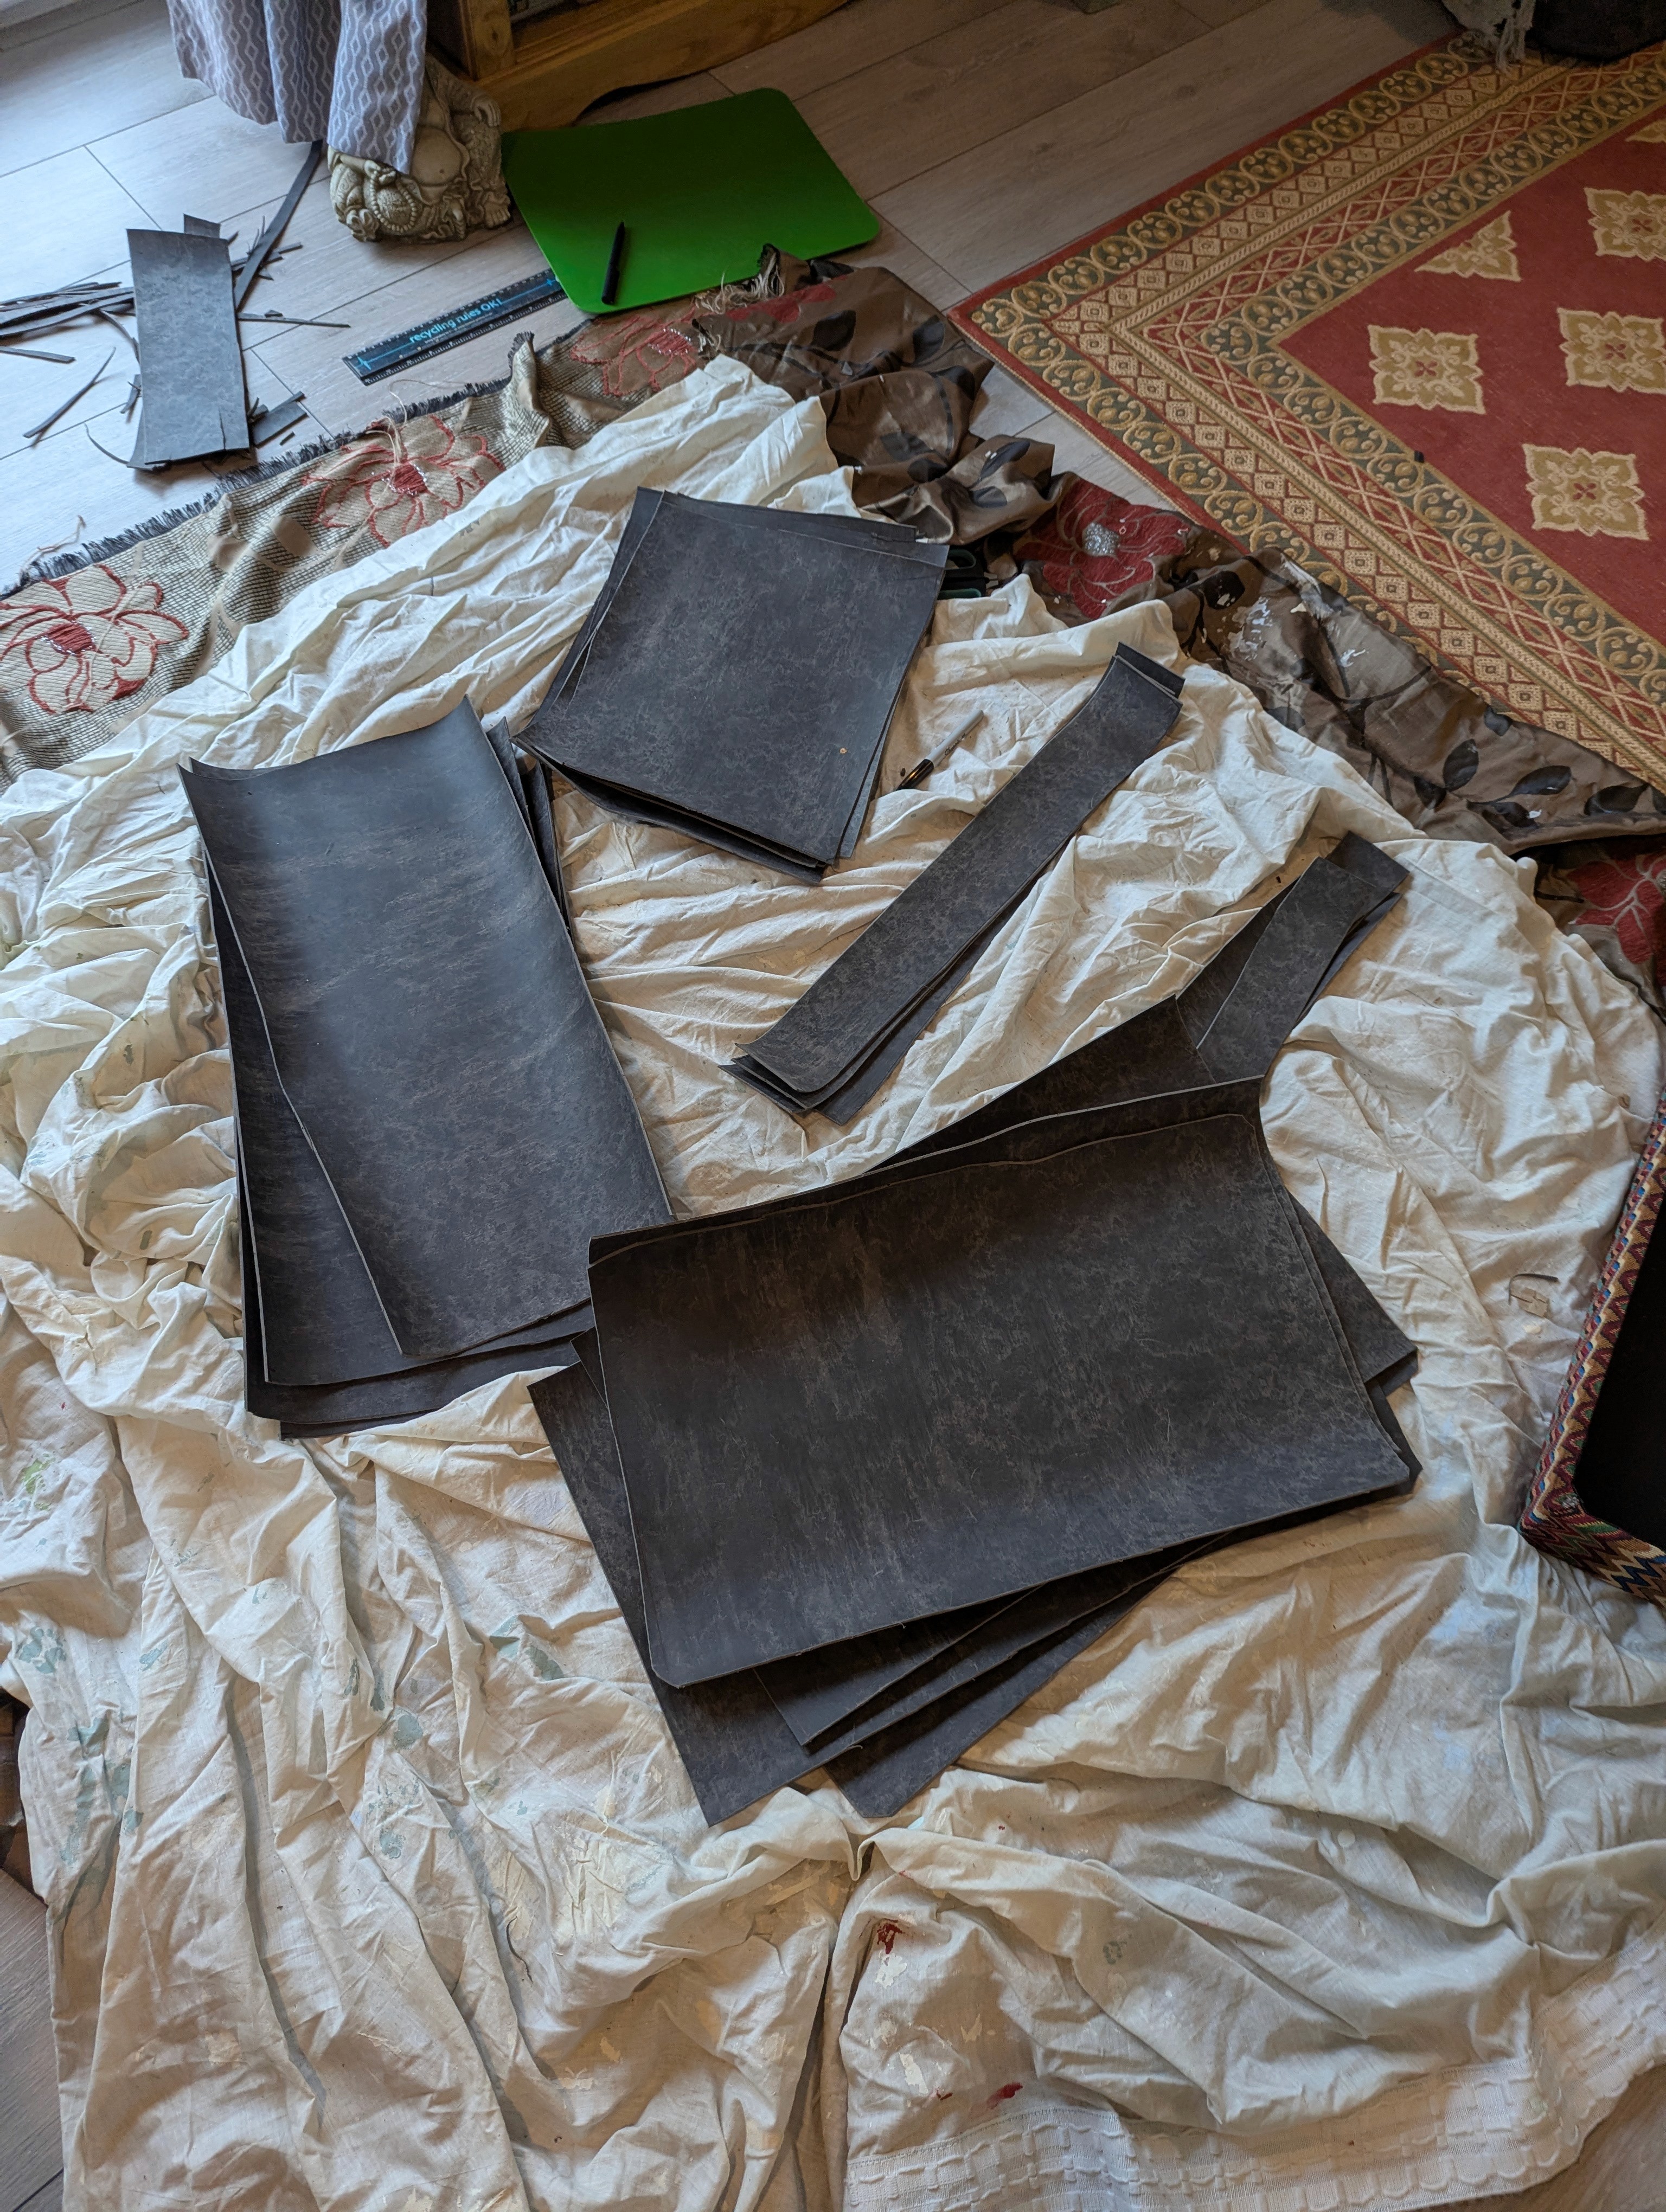
I measured each surface and then worked out how many pieces of MLV I would need for multiple layers.
Doing most of the measuring and cutting as a batch made things easier. Otherwise it quickly becomes a cycle of gluing one piece, realising another is needed, losing the tape measure, finding the tape measure, losing the pencil, and discovering that the ruler has been under your leg for the past ten minutes.
The bell of the Airdidge I use in the box is about 7 cm across, so I cut an opening into one of the short ends of the trunk.
I didn’t want to cut a neat 7 cm hole and simply leave it open. I planned for the MLV lining to overlap it later and close around the body of the instrument, so at this stage the wooden opening only needed to let the bell pass through comfortably.
This was one of those points where my grandad’s advice felt particularly relevant. Cutting vinyl incorrectly is annoying. Cutting a large hole in a perfectly good piece of furniture is rather more permanent.
Once the opening was done, I cut panels of MLV for the internal faces of the trunk. I glued the first layer directly onto the wood, pressing it firmly into place, then added another layer over it. I repeated this across the floor, walls and lid.
The box became substantially heavier, slowly enough that I didn’t really notice until I tried to move it and realised the £15 decorative trunk I had carried into the room had developed something approaching its own gravitational field.
I tried to get the MLV fitted closely around the inside and avoid unnecessary gaps. The interior underneath the Rockwool is not particularly beautiful. But I was more interested in getting good coverage than in making something nobody would ever see look immaculate.

At the didgeridoo opening, I left the MLV covering the hole and cut a series of radial slits from the centre. This creates triangular flexible flaps, essentially an eight-petal star. When the didgeridoo is pushed through, the flaps bend around it rather than leaving the whole opening exposed.
I added another layer with the cuts rotated, so the gaps in the two layers didn’t line up perfectly.
It isn’t airtight, and it doesn’t need to be. The instrument has to pass through it and move slightly, and there is an airflow issue to contend with anyway.
It also makes the didgeridoo look slightly as though it is being swallowed by a rubber sea creature, which was not part of the original specification but has grown on me.

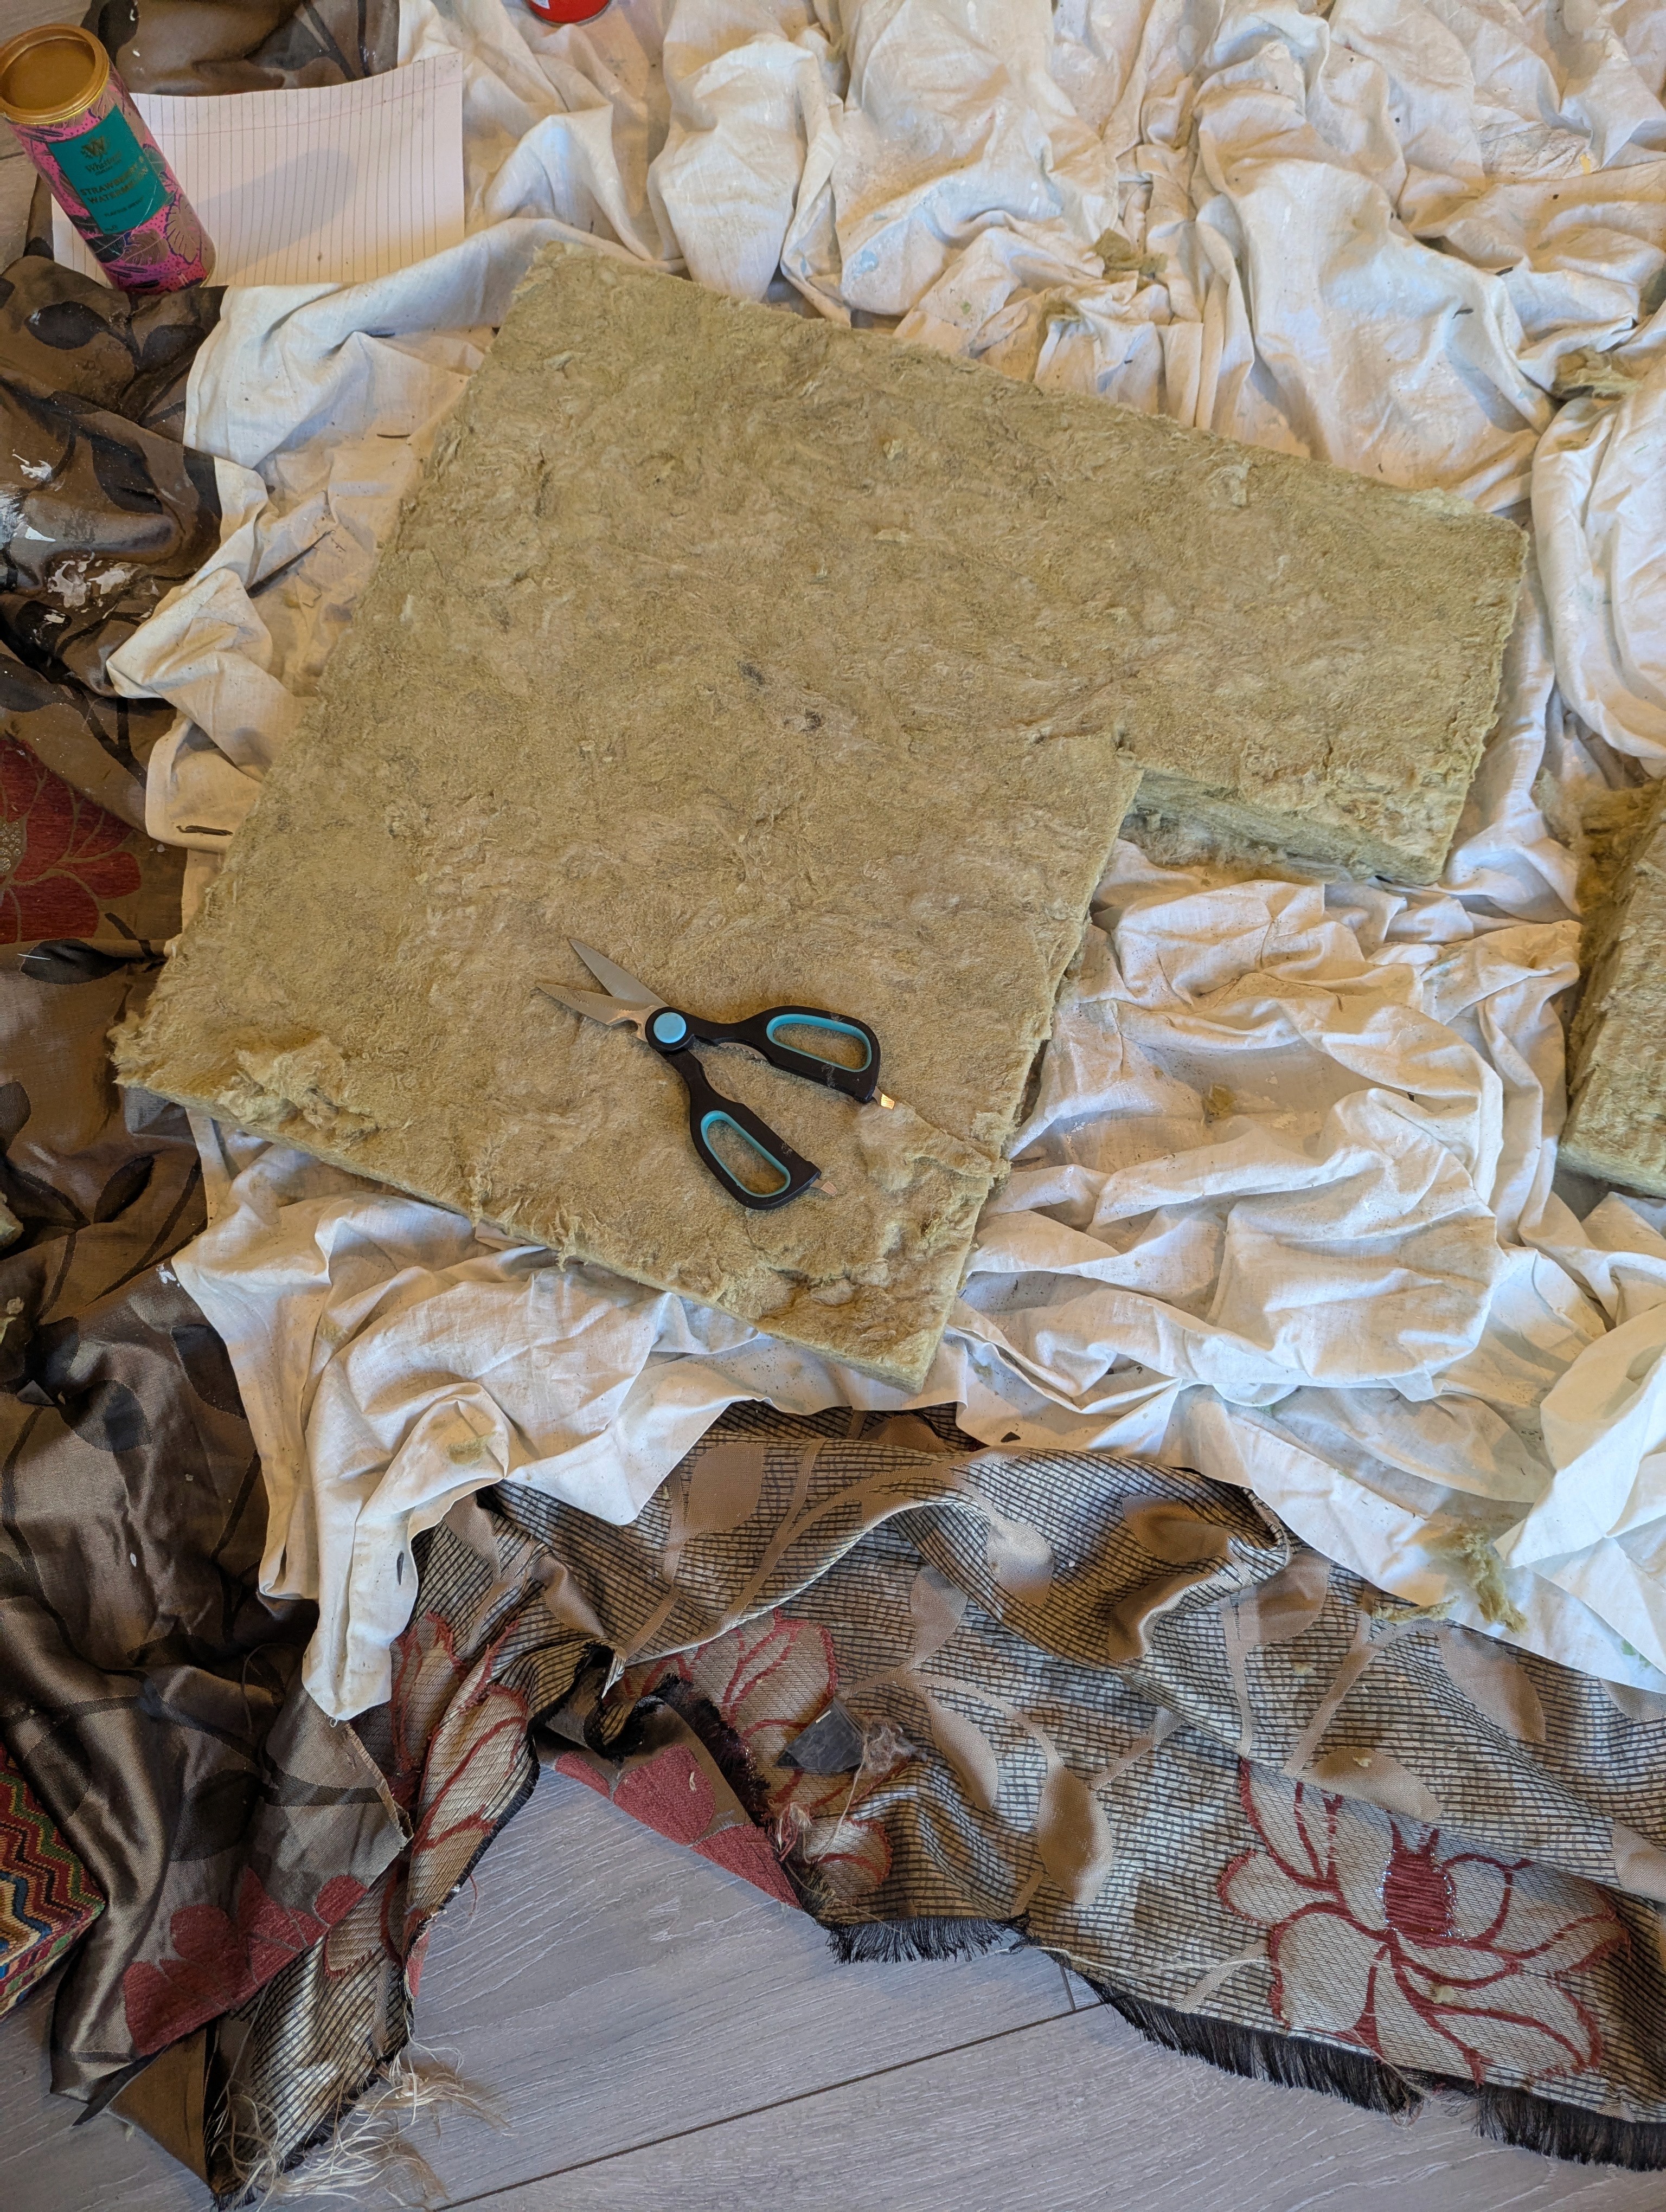
Once the MLV was in place, I measured the remaining space and cut the Rockwool to fit. It’s worth measuring again here rather than using your original dimensions. You’ve added material to every internal face by this point, so things have shifted a little.
Rockwool itself is straightforward to cut. It is also extraordinarily good at getting everywhere. By the time I’d finished there seemed to be Rockwool on me, the floor, the tools, and several objects that had not been involved in the project at all.
I wrapped the pieces in breathable fabric before fitting them into the box, mainly to keep the fibres contained. I left enough space around the bell for the microphone and some air rather than trying to pack Rockwool into every remaining gap.
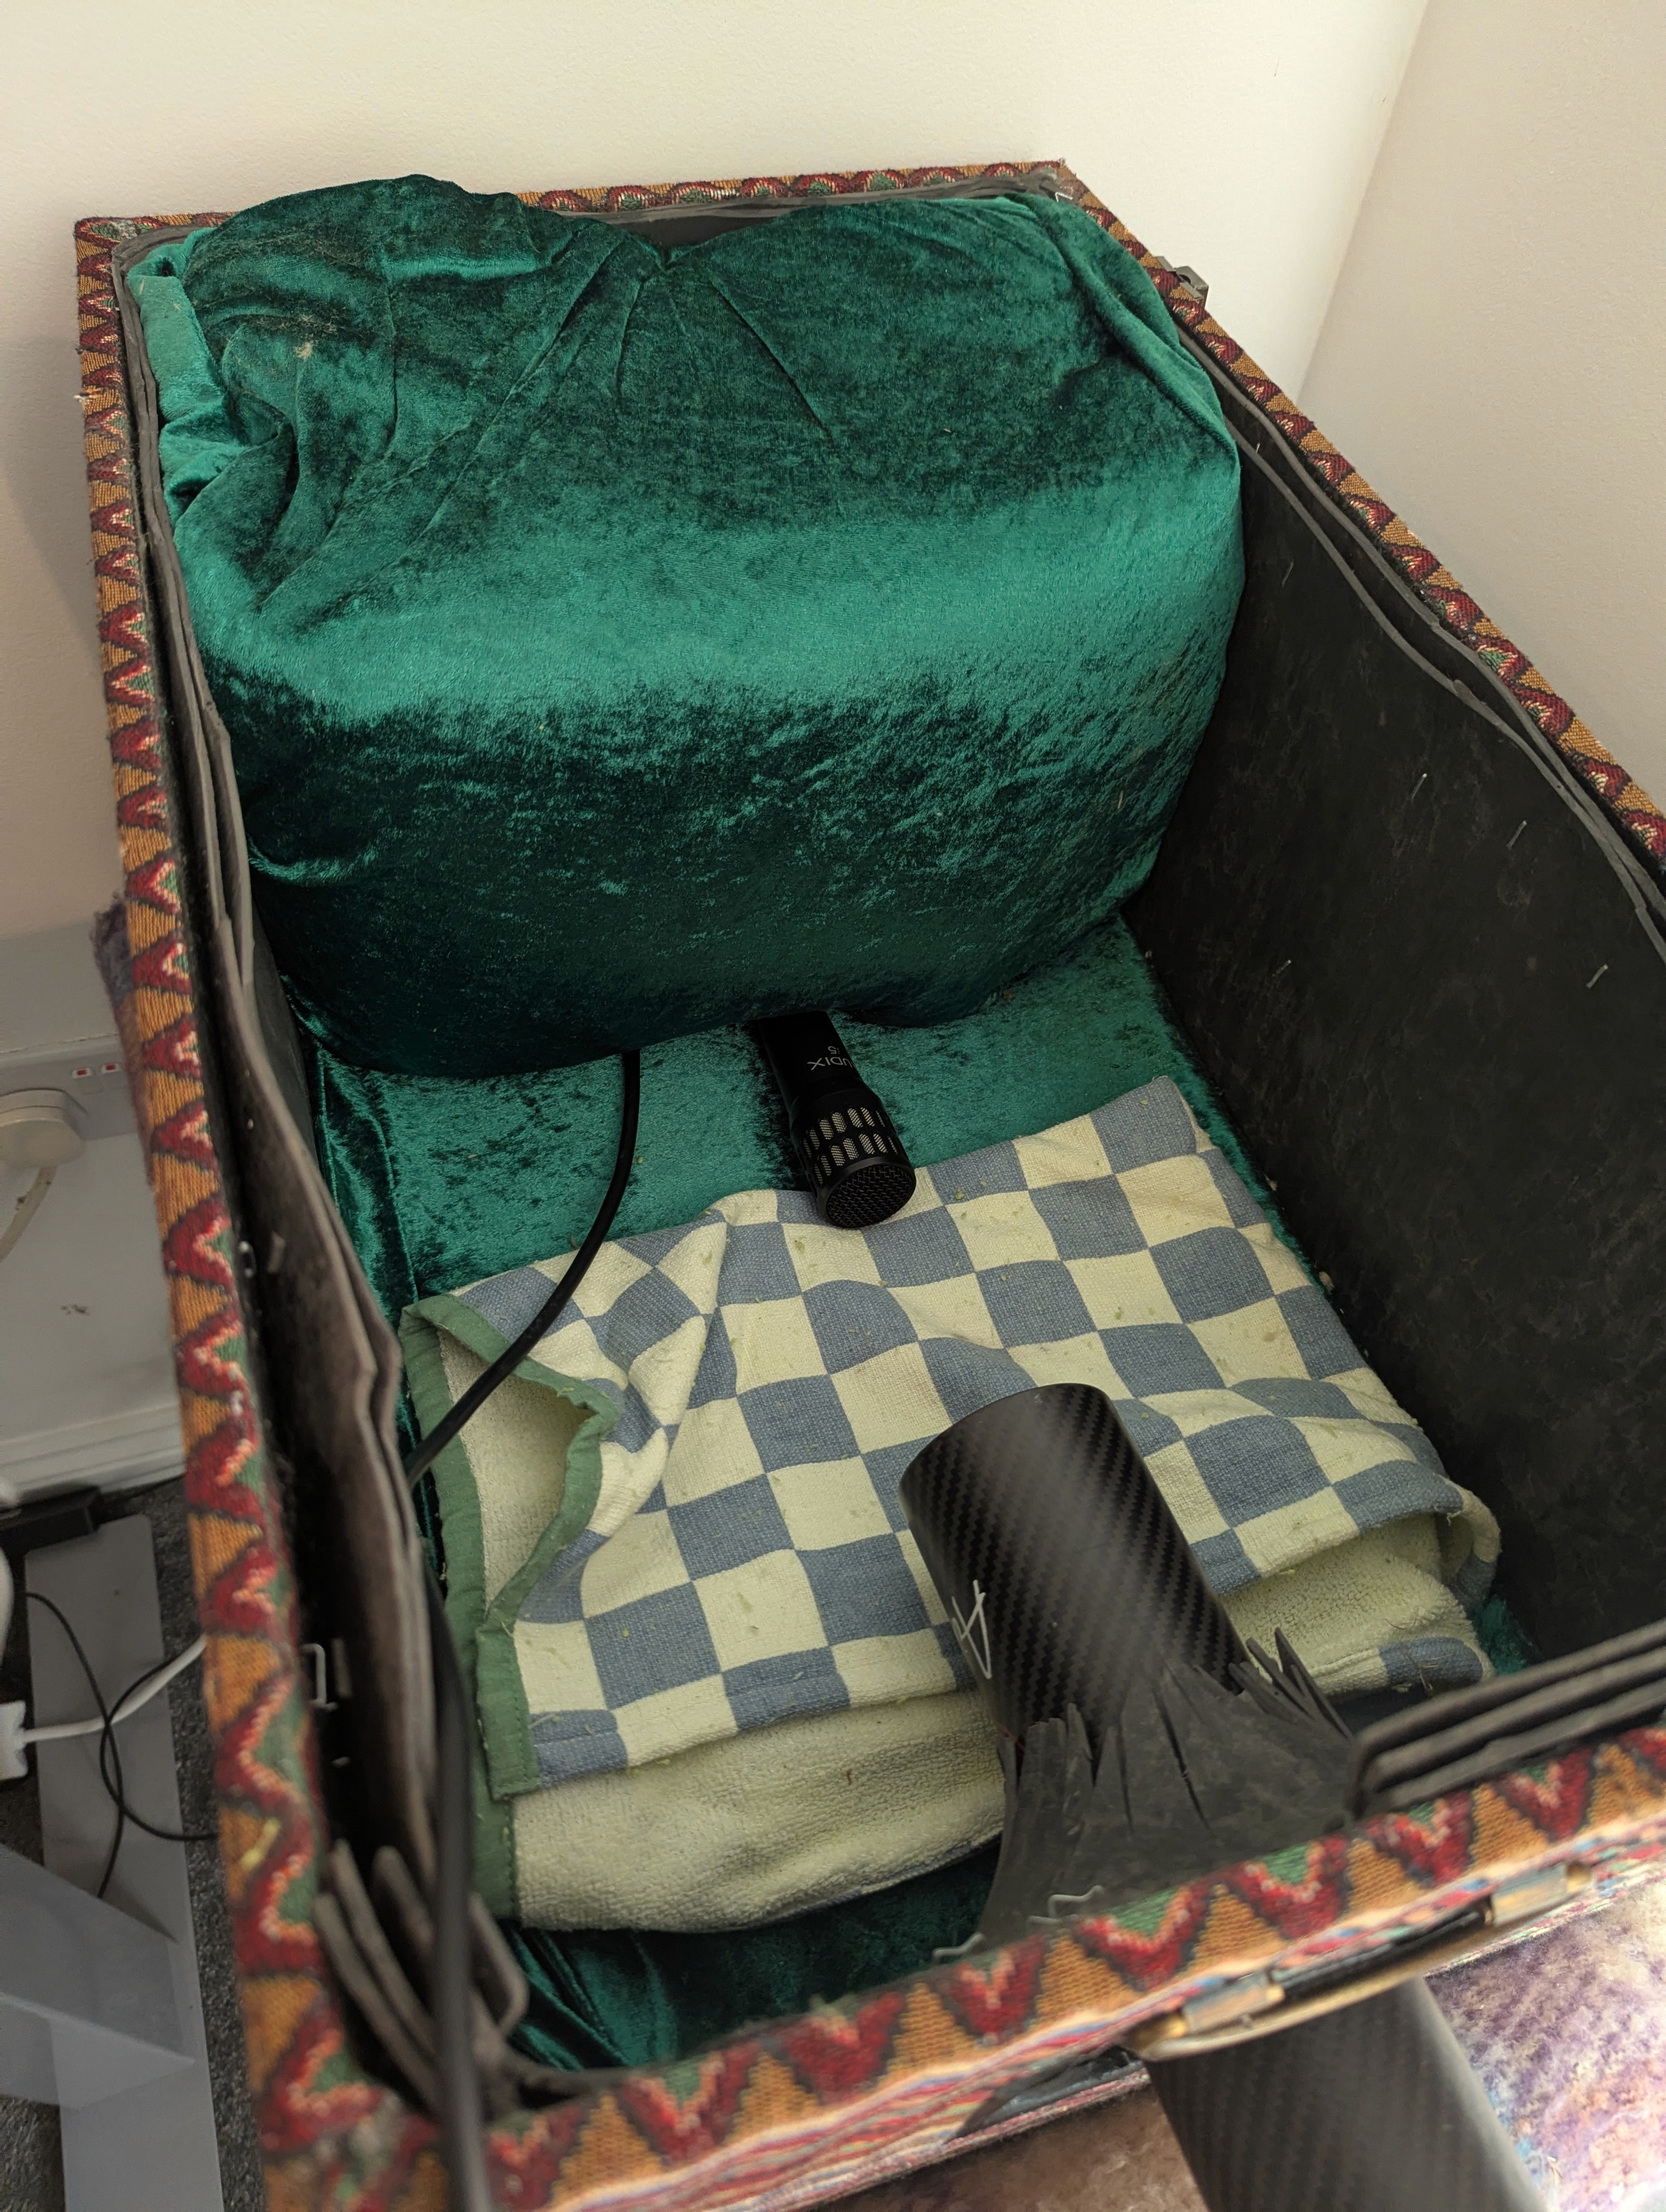
I use an Audix i5 dynamic microphone connected by XLR to a Focusrite Scarlett Solo. The microphone sits inside the box facing the bell from a short distance away rather than being pressed directly against it.
I experimented with its position until I found somewhere that sounded natural enough to me. Microphone positioning on didgeridoo is a subject in itself, and I found two resources particularly useful while I was looking into it: John Thorpe’s didgeridoo microphone playlist and Wakademy’s guide to microphones for recording and amplifying didgeridoo. The Wakademy article was one of the things that led me towards the Audix i5.
I closed the lid and played, and while the instrument still worked, it felt wrong. The dynamics changed and the resonance felt strangely constrained.
I had spent quite a lot of time thinking about how to stop air, and therefore sound, escaping from the box, and rather less time considering the fact that a didgeridoo is continually pumping air into it. The air has to go somewhere.
In the end, I just left the lid about 1–2 cm open. The difference was immediate. The instrument felt much more normal to play, while the box still gave me most of the useful sound reduction.
This is why I didn’t fit weatherstripping around the lid in the final version. I had considered sealing it tightly, but the small opening turned out to be useful.
I did briefly imagine a more elaborate baffled ventilation system, perhaps a tube out of the side with bends and absorptive material inside. It might work, but it also sounded like quite a lot of work for an uncertain improvement, so for now the slightly open lid stays.
When I first built the box, I treated it as something I set up whenever I wanted to practise. I’d move it into place, sort out the microphone, connect the interface, arrange the cables and open the software. None of those jobs takes very long, but together they are surprisingly effective at making you think, I’ll do it later.
Then I had a conversation with Dubravko Lapaine. One thing he impressed on me was the value of having a proper playing setup, somewhere you can go and immediately start playing without having to prepare everything first.
That stuck with me, so when I got home I rearranged my office.
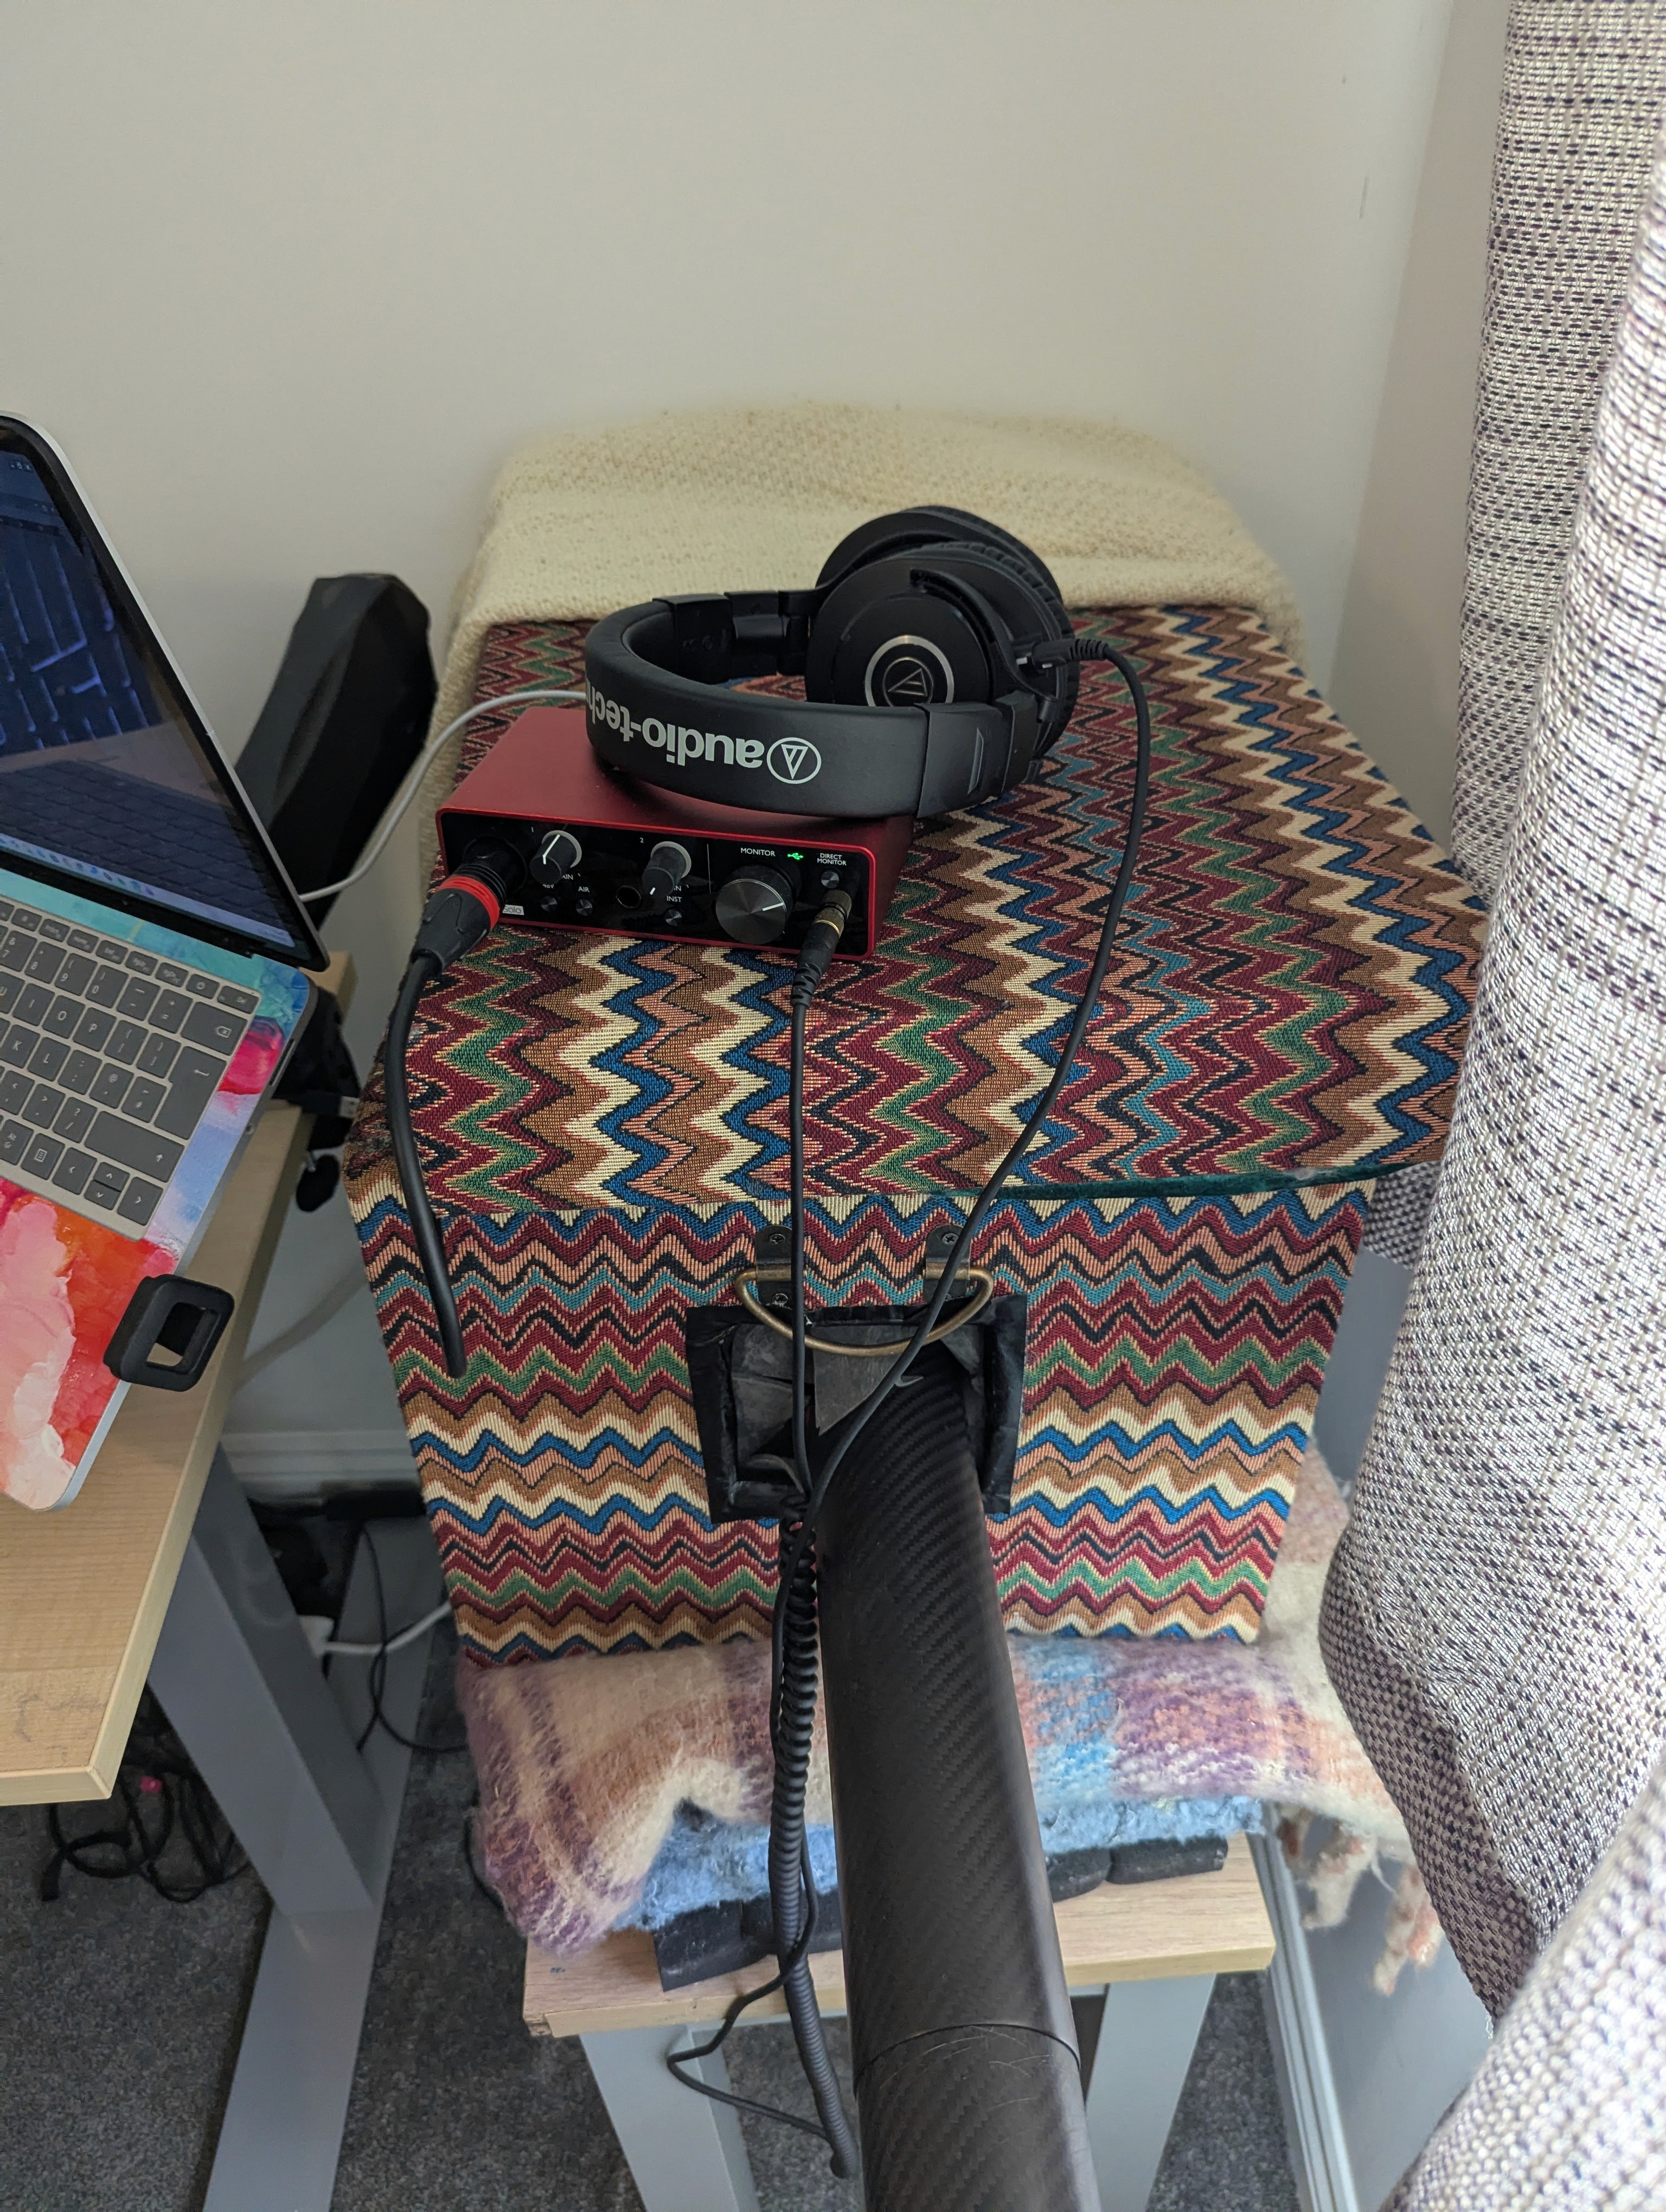
The box now lives permanently beside my desk. The Airdidge is already inserted into it, the Audix i5 stays inside, and the Scarlett Solo sits on top connected to my laptop. I can sit down, put my headphones on and start playing within seconds.
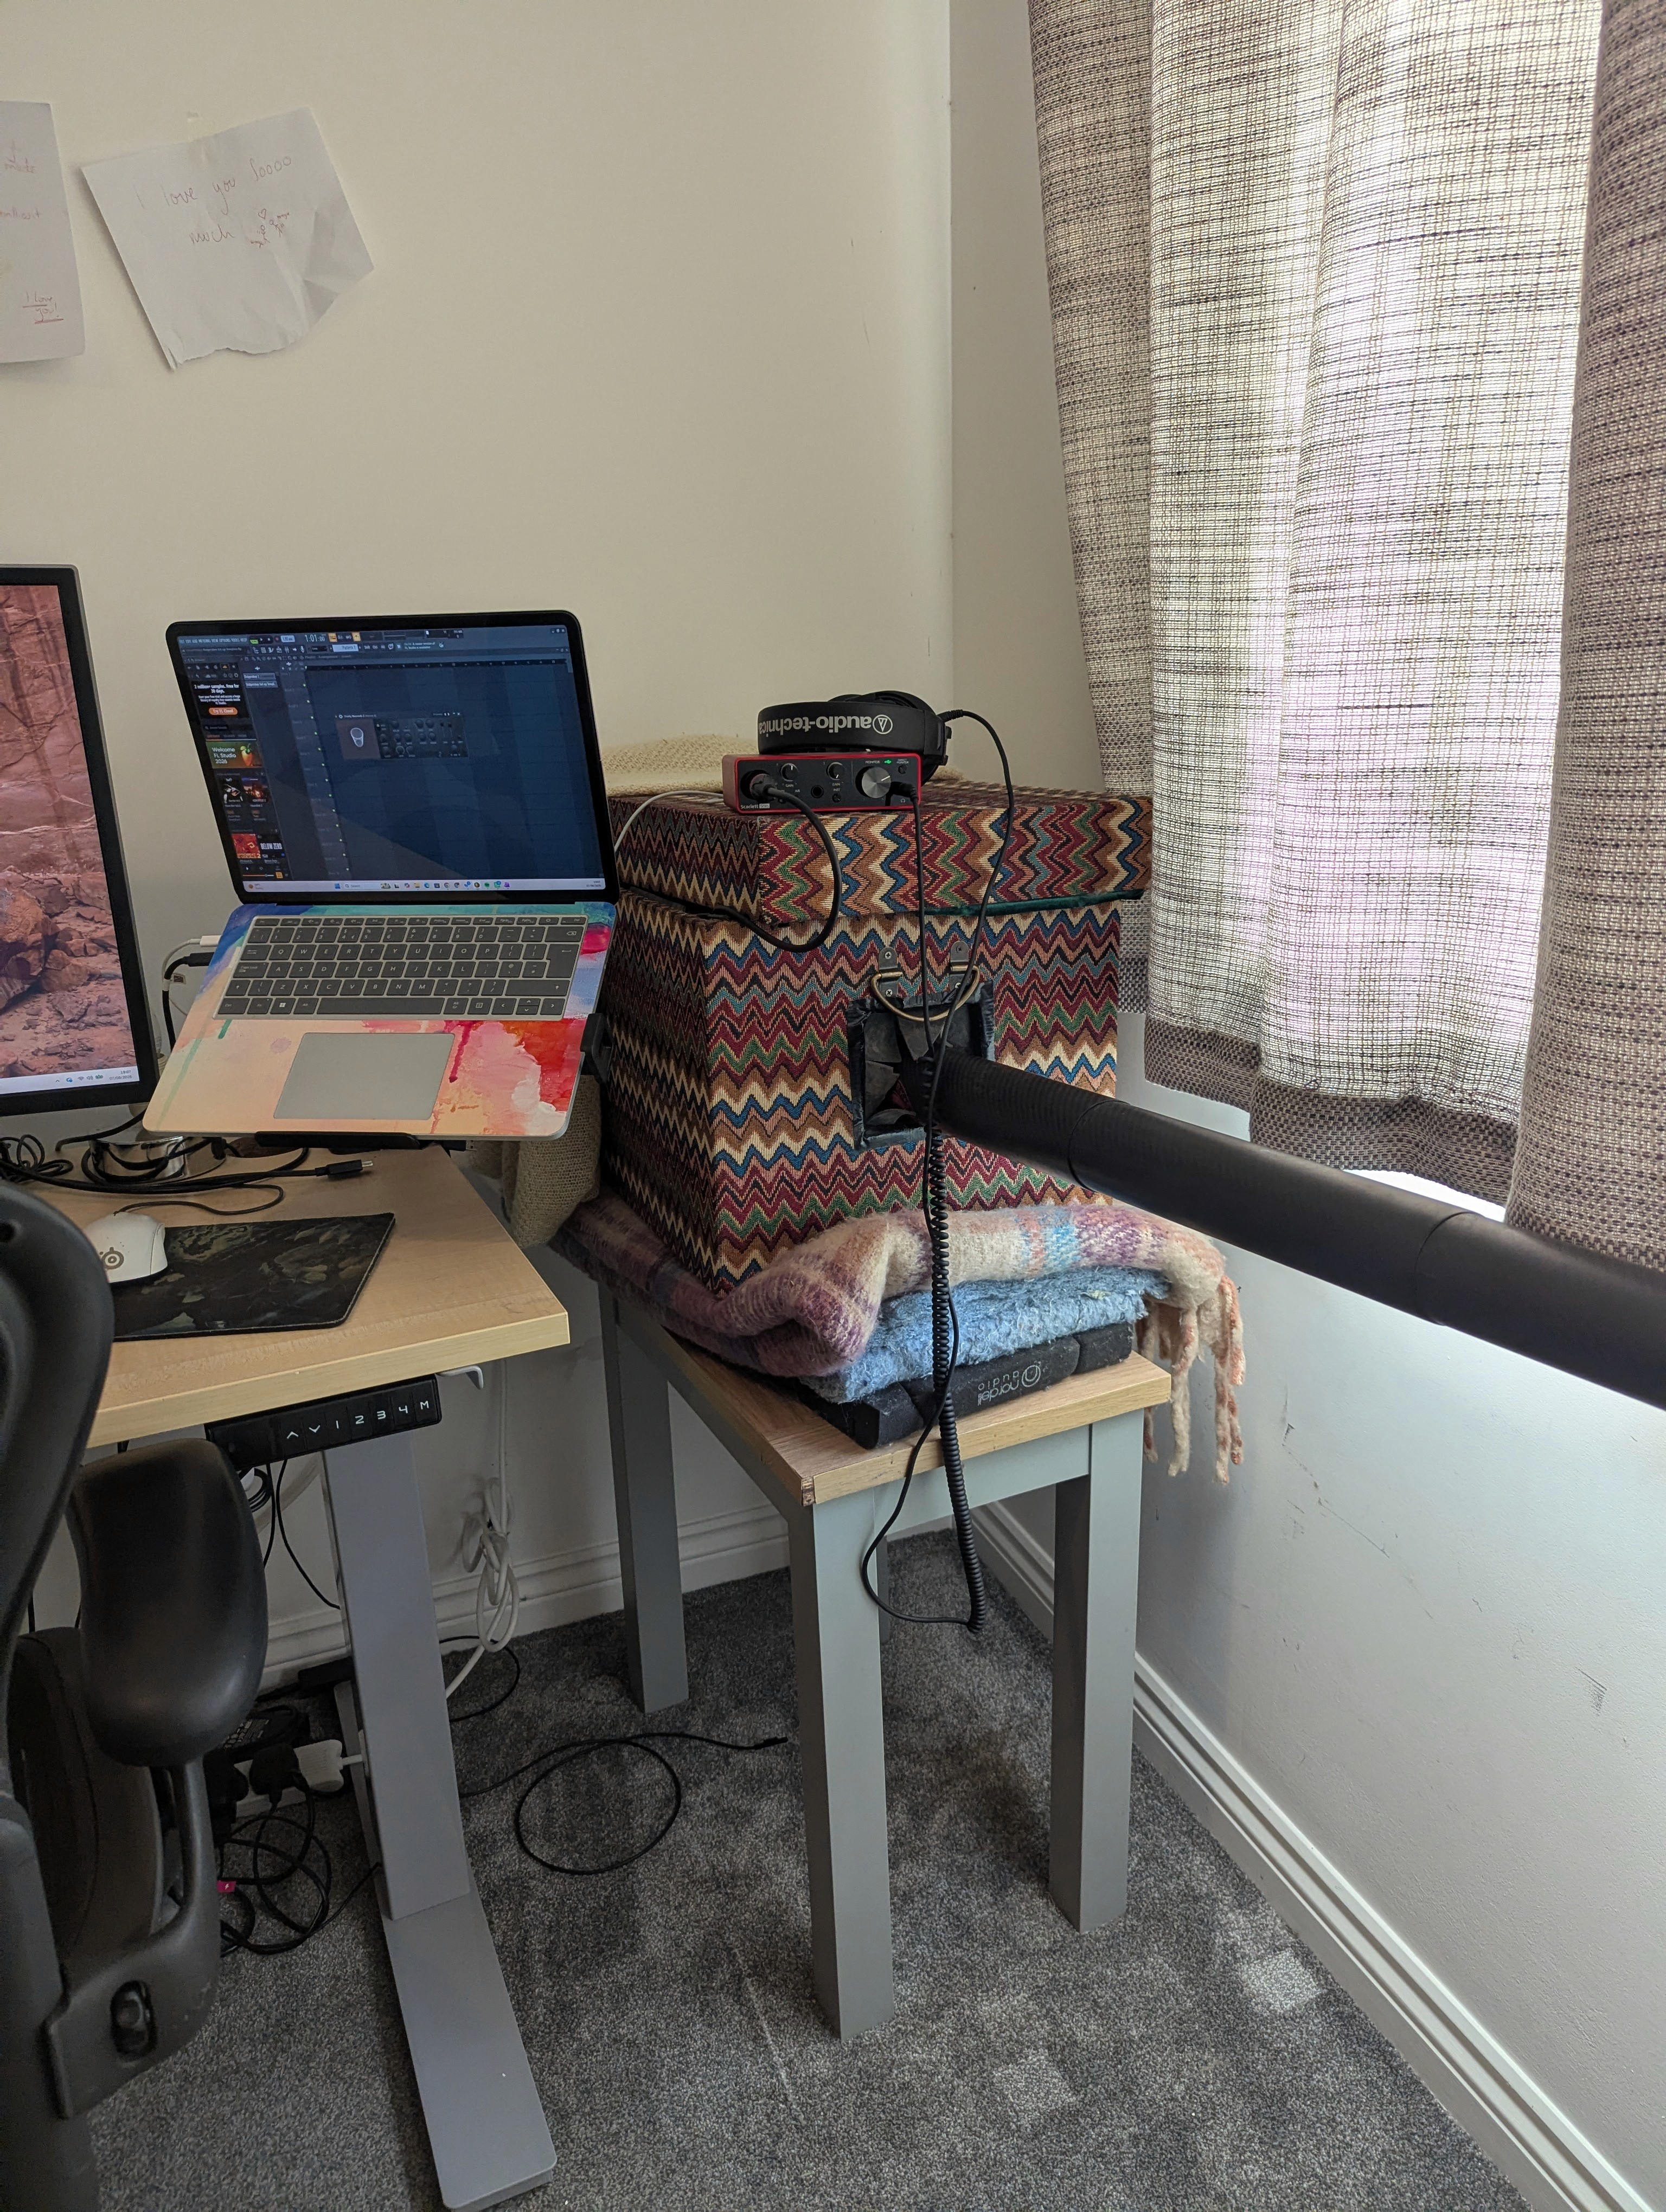
The microphone runs straight into FL Studio, and I’ve ended up using the setup for far more than quiet practice. I can put on a metronome, record a rhythm and listen back immediately, build compositions in sections, try variations, loop ideas, or capture something before I forget it. I can add reverb and hear something closer to the sound I like when performing. Being able to hear myself closely through headphones has been useful too.
Having everything permanently ready has made a real difference to how I practise. There’s no decision about whether twenty minutes of playing is worth setting everything up for. I just sit down and start.
Here are the rough readings I got at about one metre:
Quiet room: ~40 dB
Didgeridoo played normally: ~85 dB
Didgeridoo played into the box: ~76 dB
These weren’t laboratory measurements. Different rooms, measuring devices and positions will change the numbers, so I’d treat them as a rough before-and-after comparison rather than a specification for the box.
Still, a drop of around 9 dB is not trivial. Decibels are logarithmic: in terms of acoustic intensity, a 9 dB reduction corresponds to roughly one-eighth of the original intensity. That doesn’t mean it sounds eight times quieter to your ears, because perceived loudness and acoustic intensity aren’t the same thing, but it gives some sense of how significant the reduction is.
The practical test has been more useful to me. If my partner is in the next room, the sound comes through as little more than a low rumble. Eventually I asked my downstairs neighbour whether they could hear me practising, and they told me they couldn’t.
I was genuinely surprised by that, and extremely pleased. I’ve also had no noise complaints, which is not a particularly scientific measurement but is probably the one I care about most.
I’d still be cautious about treating that as a guarantee. Buildings differ, didgeridoos differ, and I’m deliberately using a relatively quiet instrument in the box. But in my flat, for the way I practise, it has done what I needed it to do.
The box works well enough that I haven’t felt a great urgency to build Mark II, but there are things I would do differently.
I’d be more methodical about fitting the MLV. The spray adhesive was convenient, but convenience sometimes won over neatness. I’d also plan the airflow earlier rather than concentrating so much on sealing the enclosure and discovering afterwards that the instrument didn’t particularly enjoy it.
I might experiment with a removable baffled vent at some point. Before adding more material, though, I’d want to test where the remaining sound is actually escaping.
There are diminishing returns to simply adding more of everything. More MLV adds weight and takes up space, more Rockwool reduces the internal volume, and sealing the lid more effectively causes problems of its own. For now, I’m happy with where it ended up.
Playing into this box isn’t as satisfying as taking a good wooden didgeridoo outside and letting it resonate freely, and it certainly doesn’t make the instrument silent. I also wouldn’t advise playing full-power didgeridoo through it at three in the morning next to somebody’s bedroom wall and then citing this article in your defence.
What I wanted was to be able to live in a flat and still practise properly without making myself deeply unpopular. So far, I can.
My downstairs neighbour tells me they can’t hear me practise. I can play without constantly wondering whether I’m irritating somebody. I can record ideas immediately, practise with a metronome, experiment with effects, work on compositions and listen much more closely to what I’m doing.
I can also just sit down and play, which has ended up mattering a lot.
We tend to talk about improving at an instrument in terms of discipline: practise more, practise properly, practise consistently. All of that matters, but I’ve become increasingly aware of how much the setup around the instrument affects whether I actually do it. When everything is already there and ready, I play more.
I’m also very aware that I am not a sound engineer. There may be much cleverer ways of doing some of this, and I’d be genuinely interested to hear from anyone who has built something similar, particularly if you’ve found a better way of dealing with ventilation or the opening around the bell.
Use this as a starting point rather than a blueprint. The exact dimensions and materials can change. I’d be interested to see what other people come up with.
And if you do find the perfect box, there is one part of the process I can recommend with complete confidence.
Get someone to drive the box home.
New blog posts, performances, workshops and other things happening around Primal Resonance.
Join the mailing list →